Developer Quickstart
Jovay is a cutting‑edge Layer 2 that delivers superior performance⚡ in throughput and latency while addressing critical security🔐 challenges. As an EVM‑equivalent Layer 2, Jovay remains fully compatible with the Ethereum ecosystem♻️.
This guide will walk you through the essential workflow for developing and deploying a basic Solidity smart contract on the Jovay network.
🎯 What You’ll Accomplish
- 🏅 Get familiar with the Jovay network and tooling.
- 🥈 Work through a basic Solidity development, deployment, and interaction cycle on Jovay.
🔧 Prerequisite
Here we assume that readers are already familiar with the concepts and usage of cryptocurrency. In order to successfully complete the tutorial, you need to be familiar with the usage of the following tools.
- 🛜 The Chrome explorer
- 💻 The Solidity programming language
- 🦊 The MetaMask wallet
- 🦔 The Remix development environment
🌐 Configure Your Wallet
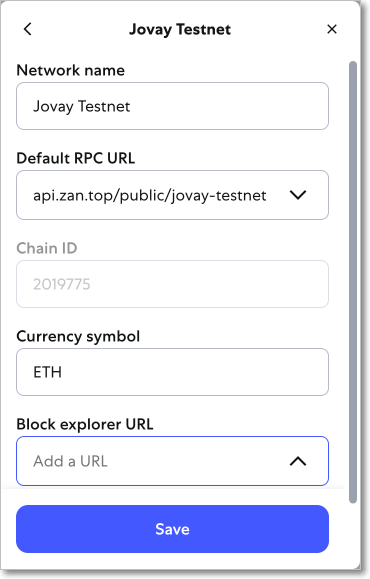
First, you need to add the Jovay network to your MetaMask wallet.
Refer to the MetaMask help document and use the appropriate configuration below.
| Configuration | Testnet | Mainnet |
|---|---|---|
| Network Name | Jovay Testnet | Jovay Mainnet |
| RPC URL | https://api.zan.top/public/jovay-testnet | https://rpc.jovay.io |
| Chain ID | 2019775 | 5734951 |
| Symbol | ETH | ETH |
| Block Explorer URL | https://sepolia-explorer.jovay.io | https://explorer.jovay.io |
For more detailed network information, please see the Network Information page.
💡Tips: We recommend adding the "Block explorer URL" part when you add network to metamask, but this is optional.
During the development phase, we recommend using the testnet. After completing development, testing, and a security audit, you can deploy to the Jovay Mainnet. Here’s how to configure the Jovay Testnet in MetaMask.
💸 Get Funds on Jovay
To pay for transaction fees on Jovay, you need its native asset, ETH. You can acquire ETH on Jovay using one of the following methods:
Method 1: Cross-Chain Bridge (Mainnet & Testnet)
The primary way to get ETH on Jovay is by bridging it from a Layer 1 network like Ethereum. This process involves locking your ETH on L1 and receiving an equivalent amount on Jovay.
For detailed instructions, please follow our complete Jovay Bridge DApp Tutorial.
Method 2: Faucet (Testnet Only)
If you are working on the Jovay Testnet, you can get free testnet ETH from a public faucet. This is the quickest way to get started with development.
- Navigate to the Faucet: Open the ZAN Jovay Faucet.
- Request Funds: Follow the instructions on the site to receive testnet ETH in your wallet.
- Check Your Balance: After a few moments, you should see the new balance in your MetaMask wallet.
🧪 Deploy a Smart Contract with Remix
This section will guide you through deploying and interacting with a simple "Hello World" style contract using the Remix IDE.
Review demo contract code
Click the link below to open a pre-loaded demo contract in Remix:
➡️ Open JovayExample.sol in Remix
This contract, JovayExample.sol, has one state variable called content. You can call the function SetContent to update it and GetContent to view it.
// SPDX-License-Identifier: UNLICENSED
pragma solidity ^0.8.0;

contract JovayExample {
    string private content = "welcome to Jovay";

    function SetContent(string memory _new_content) public {
        content = _new_content;
    }

    function GetContent() public view returns (string memory){
        return content;
    }
}
Deploy contract
Before you start, switch your MetaMask to Jovay testnet and the Remix environment to MetaMask. Then on Remix, compile the contract and deploy it. In case you don't know how, Remix has a guide for users.
After deployment, you can find your deployed contract like below. You can search your contract address on Jovay explorer and get the details.
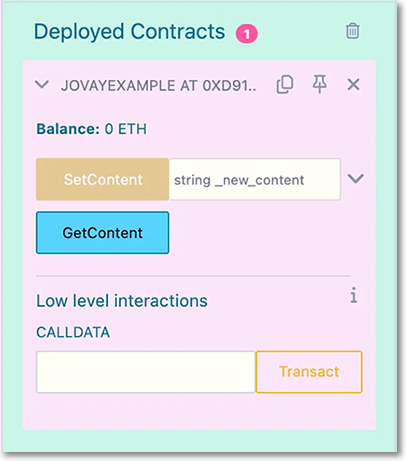
Interacting with deployed contract
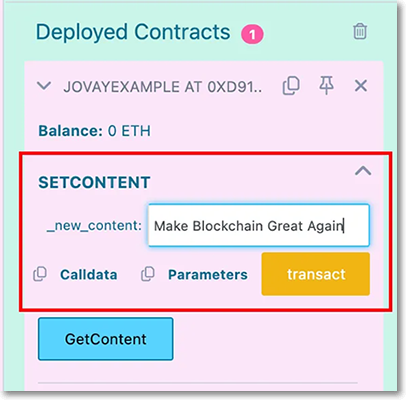
Set the some string value in the input box. And click button transact to request the wallet to sign and send a transaction to Jovay testnet.
Copy the transaction hash which you can find it from Remix console like below. Then search transaction hash on Jovay explorer and you can have more details. The transaction is going to be confirmed in seconds.

After confirmation, your account balance will be reduced to pay the transaction fee. Checkout your MetaMask to see it. You will find Jovay is fast⚡️️ and cheap💸.
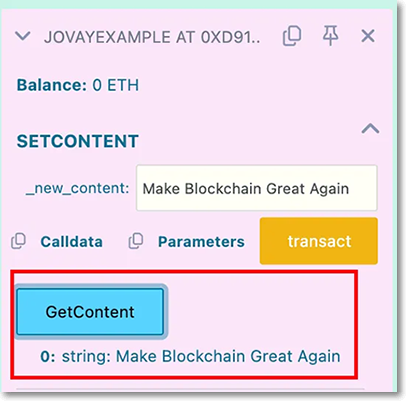
Then call the GetContent function to check the content value. You should get the updated value which set by sent transaction.
Now you understand that the smart contract development on Jovay is same as on Ethereum, and more smooth on Jovay☄️.
Next Steps
Now that you're familiar with the basics of deploying contracts on Jovay, you can explore more advanced topics and tool-specific guides.
🛠️ Tool-Specific Tutorials
Learn how to build, test, and deploy an ERC-20 token using popular development frameworks:
🌉 Bridging Assets
If you need to move assets between Ethereum and Jovay, see our detailed bridging guide: