Jovay CLI Tutorial
Welcome to the world of Jovay CLI! This tutorial will guide you through how to leverage the powerful features of Jovay CLI to create, deploy, and interact with a dApp from scratch in just a few minutes.
Together, we will walk through the following steps:
- Setup & Initialization: Import network configurations and set up your development wallet by either importing an existing one or creating a new one.
- Get Test Tokens: Fund your wallet with test currency using the built-in faucet feature.
- Build a dApp Project: Generate a new project from an official template with a single command. And deploy your project's smart contract to a test network.
- Interact with the Contract: Call functions on your deployed contract directly from the CLI.
Note: All commands for Jovay CLI can be explored at Guide
🔧 Prerequisites
Before you begin, ensure you have the following installed:
Step 1: Install && Initialize CLI
Jovay CLI is published to npm repository. We can install
1. Install
Install the jovay-cli globally by running the following command in your terminal:
npm install -g @jovaylabs/jovay-cliAfter installation, run jovay to confirm.
jovayIf install success, a welcome page will appear on success.
2. Initialize CLI
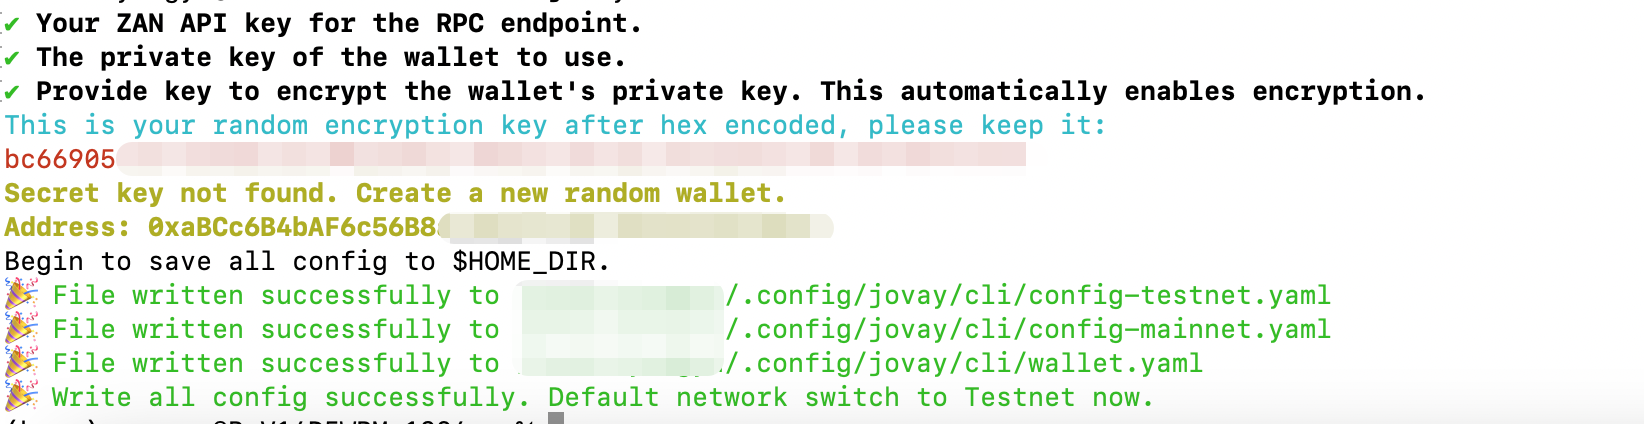
Once the installation is complete, the first and most crucial step is to set up your wallet. The following command generates a new, random wallet and immediately encrypts it, ensuring it is secure from the start. Note: Encryption wallet needs CLI version after v0.0.3.
jovay init --encA successful command will return an output similar to the following. If enable encryption on wallet with random key, be sure to save it.
Note:
- When you run the setup command for the first time, the CLI enters an interactive wizard to guide you through the configuration.
- If you do not want to import a exising ZAN API key, wallet private key or encryption key, just confirm without any inputs.
- After initialization, the default network is set to
testnet. You can usejovay network switchcommand to switch default network tomainnet. - All configurations will be written to
$HOME_DIR.
3. (Optional) Update Config
3.1 Update Network Config
The initial setup configures a default, shared RPC endpoint to get you started quickly. However, this shared endpoint is subject to a public rate limit, which can affect performance and stability during heavy use.
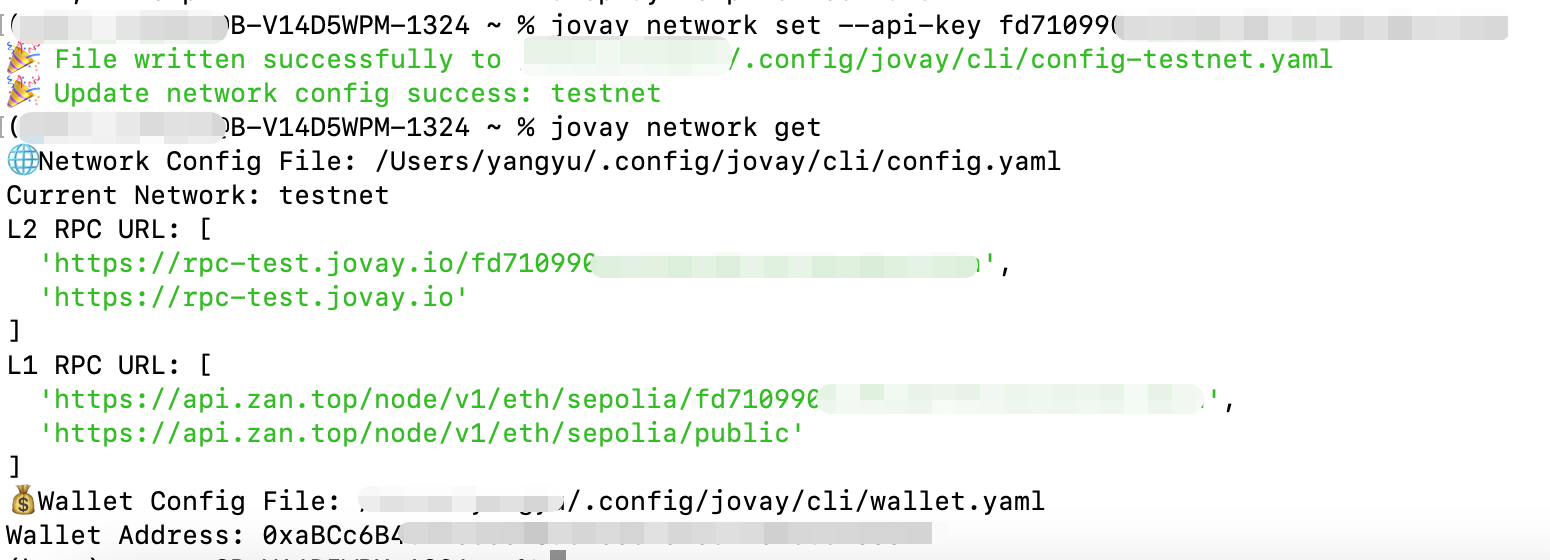
For a dedicated rate limit and a more reliable connection, it is highly recommended to use your own personal API key. You can update the default network configuration by running the following command:
# set rpc with zan api key both on ethereum and jovay
jovay network set --api-key ${YOUR_ZAN_API_KEY}
# check if switch success
jovay network get
A successful command will return an output similar to the following:
3.2 Update Wallet Config
To modify your wallet configuration later (e.g., changing the private key), you can use the jovay wallet set command. For full details on its usage, please refer to the Command Reference.
Step 2: Get Funds
Jovay Sepolia ETH is required to deploy and interact with your contracts. The CLI provides a convenient command to get test tokens from the official faucet.
Run the following command. The official Jovay faucet will send 0.001 ETH to your account.
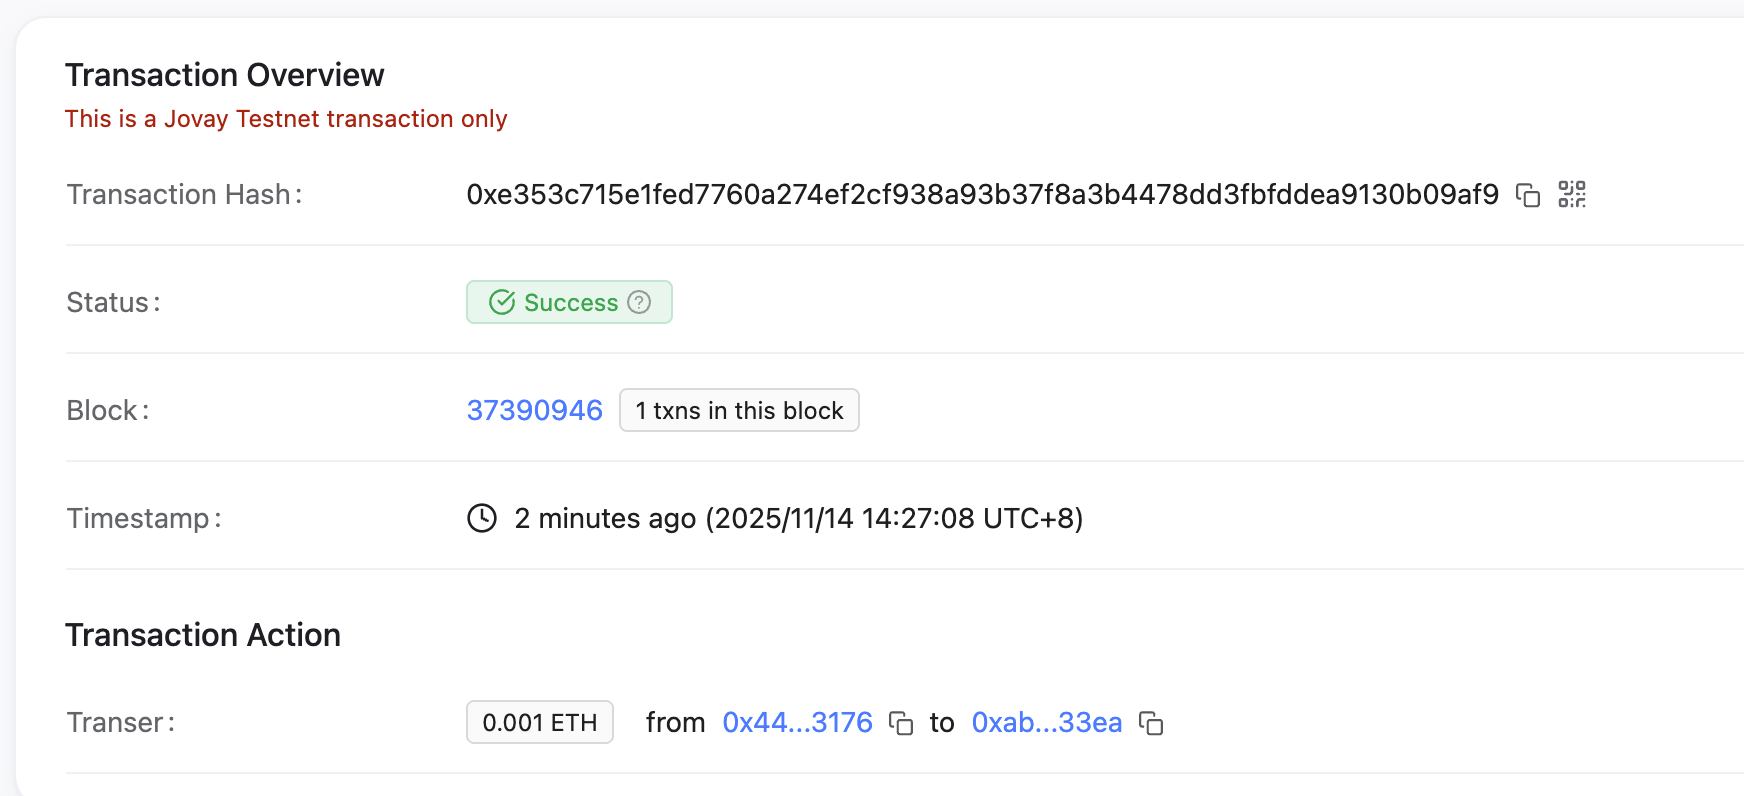
jovay wallet airdropOnce executed, the terminal will output a transaction hash and a link to the block explorer.

You can follow the link to verify that the transaction was successful.
Alternatively, you can check your directly from the CLI:
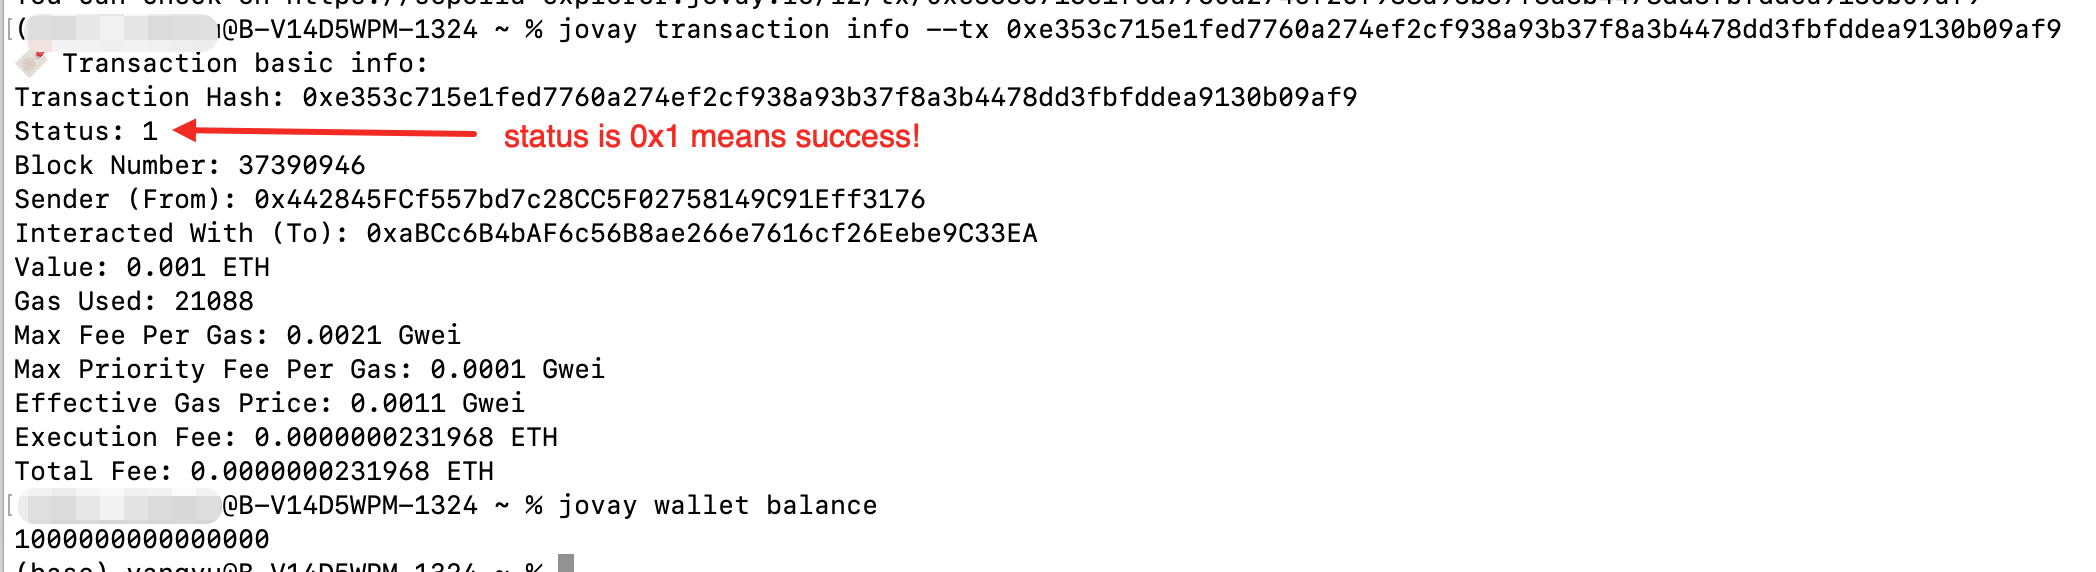
# check transaction info
jovay transaction info --tx ${TX_HASH}
# confirm the funds have arrived
jovay wallet balance
The commands return as following. The status for transaction is 0x1 means success. And the balance is show in Wei.
Step 3: Build a DApp Project
Time to build your dApp! We'll show you how Jovay CLI handles the heavy lifting. With one command, you can initialize the project, then use CLI to easily compile and deploy the sample contract on-chain.
1. Initialize the Project with Template
Jovay CLI simplifies project creation through pre-built development templates. Currently, it provides:
- EasyJovayDappTemplate (default) : An out-of-the-box, full-stack dApp template that combines a modern Vue 3 frontend stack with a Hardhat smart contract workflow, providing a one-stop, efficient development experience from contract to frontend.
We will use this template to initialize our project in this tutorial. Please note that support for more templates will be added as the project evolves.
jovay dapp init --name ${PROJECT_NAME}
Project initialization is complete and struct gives as following. Now, we have two main directories: contracts/ for smart contracts and frontend/ for frontend code. The contracts directory contains some sample files for reference, which you can safely delete if you don't need them.
├── contracts/              # Smart contract files and ABIs
├── frontend/               # Vue.js frontend application
│   ├── src/
│   │   ├── components/     # Reusable Vue components
│   │   ├── views/         # Page components
│   │   ├── stores/        # Pinia state management
│   │   ├── config/        # Configuration files
│   │   └── contracts/     # Contract ABI files
├── docs/                  # Documentation
│   ├── llm-guides/        # AI/LLM development guides
│   └── prompts/           # Standardized development prompts
├── tools/                 # Development and deployment scripts
└── scripts/               # Contract deployment scripts
2. Write && Compile Contracts
In this section, we will create a standard ERC721 NFT contract using the battle-tested OpenZeppelin library. This is the industry-standard approach for building secure and compliant tokens.
Install Requirements:
It's recommended to install dependencies with
./tools/install_deps.sh. But it's required that, before we can use OpenZeppelin's code, we need to add it to our project as a dependency. Open your terminal in the project's root directory (SimpleJovayDapp/in the case) and run the following command:bashcd SimpleJovayDapp # Optional install deps ./tools/install_deps.sh npm install @openzeppelin/contractsWrite a new solidity contract:
bashtouch contracts/SimpleNTF.solCreate a new solidity contract file and paste the following code into it.
// SPDX-License-Identifier: MIT
pragma solidity ^0.8.20;

import "@openzeppelin/contracts/token/ERC721/ERC721.sol";
import "@openzeppelin/contracts/token/ERC721/extensions/ERC721URIStorage.sol";
import "@openzeppelin/contracts/access/Ownable.sol";

contract SimpleNTF is ERC721URIStorage, Ownable {
uint256 private _tokenIdCounter;

    constructor(
        address initialOwner
    ) ERC721("SimpleNFT", "SNFT") Ownable(initialOwner) {}

    function safeMint(address to, string memory uri) public onlyOwner {
        uint256 tokenId = _tokenIdCounter;
        _tokenIdCounter += 1;
        _safeMint(to, tokenId);
        _setTokenURI(tokenId, uri);
    }
}
Compile the contract:
Use following CLI command to compile the contract. As using encrypted wallet, the wallet encryption key is needed.
bashjovay dapp build --enc-key ${YOUR_WALLET_ENC_KEY}After building, the terminal shows following information. And we can see your abi at
artifacts/contracts.

3. Deploy the Contract
The moment of truth has arrived! With our contract compiled, we are now ready to deploy it on-chain to the Jovay Sepolia Testnet using the CLI.
Update deploy script
scripts/deploy,js:const { ethers } = require("hardhat"); async function main() { const [deployer] = await ethers.getSigners(); console.log("Deploying contracts with the account:", deployer.address); // the name of the contract in the artifacts, not the solidity file name const SimpleNTF = await ethers.getContractFactory("SimpleNTF"); const demo1 = await SimpleNTF.deploy(deployer.address); await demo1.waitForDeployment(); console.log(`SimpleNTF deployed to ${demo1.target}`); } main().catch((error) => { console.error(error); process.exitCode = 1; });Deploy the contract:
Use following CLI command to deploy the NFT contract. As using encrypted wallet, the wallet encryption key is needed.
bashjovay dapp deploy --enc-key ${YOUR_WALLET_ENC_KEY}After deploying, the terminal shows the deployer's address, and contract address is
0x722526A8eB9e610B97736B2c50f40a0adE1a1368.

4. Call the Contract
Prepare for
safeMint:According to our contract's code, the
safeMint(address to, string memory uri)function requires two arguments:- to (address): The recipient address for the NFT. For this, we will use our own wallet address.
- uri (string): A link to the NFT's metadata. The metadata is a JSON file that describes the NFT's name, image, and other properties.
For convenience, we have prepared a sample metadata URI, which image is logo of Jovay. However, to simplify this tutorial and avoid the extra step of uploading files to IPFS, we will use a standard HTTPS link instead.
The metadata following stores at here, url can be directly used to mint a nft:
{
    "name": "My First Jovay NFT",
    "description": "An awesome NFT created and deployed with Jovay CLI!",
    "image": "https://mdn.alipayobjects.com/huamei_rqgebe/afts/img/AL7HQ6tCvAoAAAAAQMAAAAgADlxJAQFr/original"
}
Call contract:
Now, run the following command to mint our nft!bashjovay contract write --contract 0x722526A8eB9e610B97736B2c50f40a0adE1a1368 \ --method safeMint --inputs address,string \ --args '"${RECEIVER_ADDRESS}","https://website.jovay.io/jstack/jnft.json"' \ --enc-key ${YOUR_WALLET_ENC_KEY} --broadcastIf success, the transaction hash will be output, and also can be checked in the same way of Get Funds.

NFT can be explored at MetaMask after importing.

Troubleshooting
- Dapp Build failed? Make sure you have installed dependencies and hardhat.
Conclusion
Congratulations! You have successfully navigated the entire dApp development lifecycle using Jovay CLI—from setting up a wallet and acquiring test funds to scaffolding, deploying, and interacting with a live smart contract. As you've seen, Jovay CLI streamlines this complex process, allowing you to focus on building rather than on boilerplate and configuration.
Your journey doesn't end here. We encourage you to continue exploring:
- More commands for Jovay CLI can be explored at Guide
- Official Foundry documentation.
- Official Hardhat documentation.
🚀Happy coding!